Introduction
- Wash hands (and don PPE if needed)
- Introduce yourself (name and role)
- Confirm patient’s name and DOB
- Explain what the examination involves
- Gain consent to continue
- Ask if patient in any pain before continuing
General Inspection
Clinical Signs
- Body habitus
- Scars
- Obvious swelling
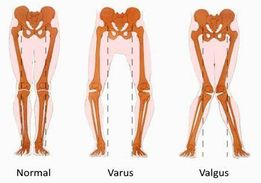
- Varus or valgus deformity
Objects and Equipment
- Walking aids
- Prescriptions
Gait
Walk to the end of the room and turn back
- Gait cycle and ROM
- Limping
- Leg length
- Turning
Look
Closer inspection of the leg
- Deformity
- Wasting
- Asymmetry
- Swelling
- Scars
Feel
Temperature
- Feel the skin temperature of both legs at the same time with back of hand
Joint lines
- Palpate for tenderness along the joint line and patella
- Feel behind the knee for popliteal (Baker’s) cyst
Patella Tap
- Assess for effusion by performing patella tap
Move
Passive movement
- Ask the patient to actively extend and flex the joint to maximum and establish RoM and if there is any pain
- Then ask the patient to relax and passively move the joint with one hand on the patella to feel for crepitus
Fixed flexion deformities
- Place hand under knee and ask patient to straighten this leg to check for any fixed flexion deformity
Hyperextension
- Hold the ankle and raise the leg. If hyperextension, the knee will droop
Ligament stability
- Check for ACL and PCL stability by sitting on foot and pulling forwards and backwards - not trying to illicit pain but looking for physical movement of the joint
- Test MCL and LCL by trying to move leg in both directions with the other hand acting as a pivot
Special Tests
Meniscus injuries
- McMurray’s test - half flex and internally rotate the leg to test the lateral meniscus
ACL Injury
- Lachman’s Test - stabilise the femur with one hand and gently pull the tibia anterior and posteriorly
To Complete the Exam
- Explain to the patient that the examination is now finished.
- Thank the patient for their time.
- Dispose of PPE appropriately and wash your hands.
- Summarise your findings.