Vital signs
Temperature, pulse, respiratory rate, blood pressure and SpO2.
Gather equipment
- Ear thermometer
- Disposable tip
- Oxygen sats probe
- Sphygmomanometer
- Stethoscope - cleaned with alcohol wipes
For each explain the procedure and wash hands
Temperature
- Apply disposable probe
- Retract the ear and place probe in ear
- After scanning, remove the probe, dispose of tip in clinical waste
- Record temperature on relevant paperwork
Pulse and respiratory rate
-
Palpate radial pulse for 15 seconds
-
Note rhythm rate and character
-
Multiply by 4 to get BPM
-
While still palpating the pulse count the respiratory rate for 15 or 30 seconds
-
Multiply by 2 or 4
Blood pressure
Patient should be rested for 3-5 minutes before blood pressure is measured
- Clean stethoscope
- Sit the patient in a neutral position
- Palpate brachial pulse and apply cuff over brachial artery
- Place the stethoscope over brachial artery and palpate radial pulse
- Inflate cuff to get a ball-park reading and then deflate
- Reinflate the cuff to 20-30mm above the ball-park and slowly release.
- Listen for when two consecutive heart beats can be heard (systolic)
- Continue to delate the cuff until no sounds can be heard (diastolic)
To test for postural hypotension then get the patient to stand and remeasure the blood pressure. The BP is expected to rise when the patient stands up.
Oxygen Saturations
Cold extremities, nail polish and patient movement may give false low readings
- put on the probe and read the number lol
Peak flow
Demonstrating/explaining the correct technique is very important:
- Ask the patient to stand ideally - sitting upright if cannot
- Place a new mouthpiece into the peak flow
- Check the gauge is set to 0
- Explain that the peak flow monitor should be held horizontal. The patient should take a deep breath before blowing as hard and fast as possible into the mouthpiece. Their lips should be sealed around the mouthpiece to prevent any air escaping
- Demonstrate this to the patient before changing the mouthpiece and asking them to do the same
- Repeat the process 3 times and record the best of these results
- If the patient does this regularly at home ask what their normal value is
Urinalysis
Gather equipment
- Urine pot
- Urine dip sticks
- Gloves + apron
- Clock
Introduction
- Introduce yourself to patient
- Ask patient for their name and DoB
- Provide the patient with the urine pot
- Explain that you need a mid-stream sample of urine
- Wash own hands and put on PPE
Check the sample
- Check clarity, particles, colour before removing lid
- Remove lid and see if there is an obvious odour
- Check that the urine dip stick container is intact and in-date
- Remove a strip from the container and replace lid
- Dip test strip into urine to wet all zones for <1 second and remove
- Replace lid of urine pot
- Note the time
- Line up the strip and compare to correct section at correct time
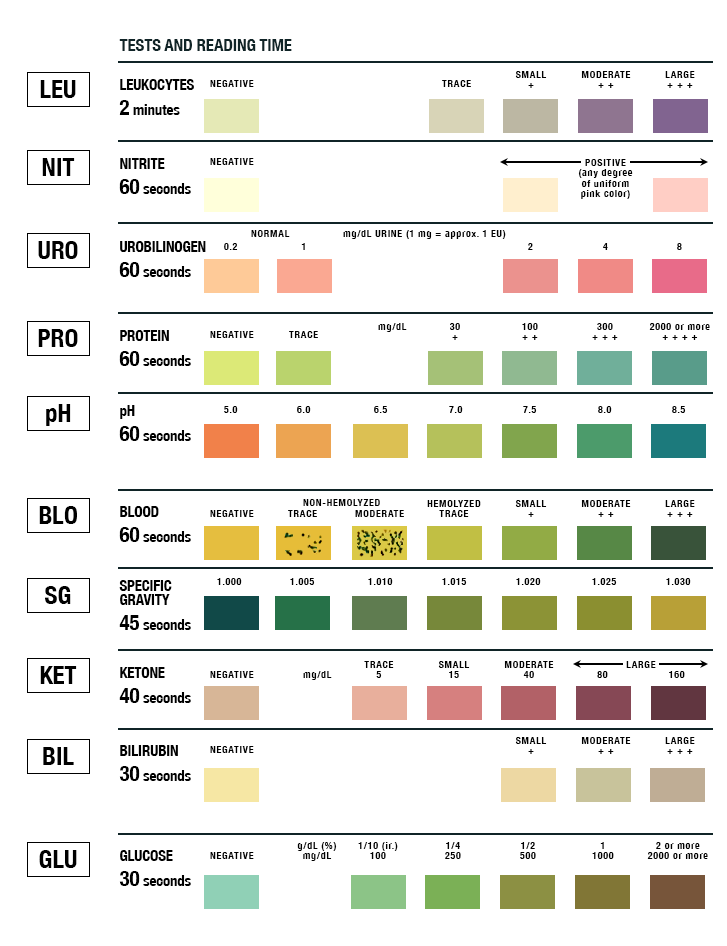
- Note any abnormalities
- Dispose of waste - urine down sluice or toilet, container, strip and gloves into clinical waste
- Wash hands
- Record results
Blood Glucose
Gather equipment
- PPE
- Glucometer
- Testing strips
- Lancet
- Sharps bin
- Alcohol wipes
- Cotton wool/plaster
Introduce yourself, check patient and gain consent
- Ask the patient if theres a finger they’d prefer and clean that finger with an alcohol wipe
- Place the test strip into the glucometer
- Prepare the lancet by twisting the needle cover off
- Choose a site on the lateral side of the finger
- Warn the patient of the scratch and deploy the lancet
- Place in the sharps bin
- Get a drop of blood onto the test strip
- Place the cotton wool over the site and hold until the bleeding has stopped
- Note the reading
- Dispose of contaminated equipment into clinical waste
- Wash hands